Mastering Python and Bash for Next-Level Automation
The Evolution Of Computers
Engineer, Builder, Trainer.
Description
You should be able to identify the following points by the end of this article:
Describe Bourne-Shell, Bourne-Again Shell, and Programming Language Scripting.
Capable of installing and writing scripts in Bourne-Again Shell on Linux, macOS and Windows-Based OS.
Capable of working with Python including, installation, writing code and execution.
A Brief History of the Unix Command Line
Automation has long been a part of computing, and Unix has played an important role in the development of automation tools and techniques.
One of the earliest forms of automation on Unix systems was the use of shell scripts.
The Bourne shell, also known as the "sh" shell, was the first Unix shell that was released in 1979. Stephen Bourne created it at Bell Labs, and it quickly became the standard shell on many Unix and Linux systems.
The Bourne shell is a command-line interface (CLI) that lets users enter commands and have them executed on a Unix or Linux system.
It can also run scripts, which are programs that contain a series of commands that are executed in order. These scripts can be used to automate tasks like system administration and data processing.
Bourne shell is still used on many Unix and Linux systems today, and it is an important part of computing history.
From this point forward, the Bourne shell was superseded by the Bash shell, which was designed to be a more feature-rich and user-friendly alternative to the Bourne shell.
Let's learn more about it.
Bourne-Again Shell
The Bash, or Bourne-Again Shell, is a Unix shell and command language that was developed as an improvement over the Bourne shell by Brian Fox in the late 1980s.
Bash's inclusion of a large number of built-in commands and utilities was one of its key innovations. This enabled users to perform a wide range of tasks without the need to install additional software. Bash also improved the programming language by adding better control structures and the ability to define functions.
Along with these enhancements, Bash added support for command line editing and command history, making it easier for users to work with the shell and eventually resulting in version control in modern times.
Since its release, Bash has become the default shell on many Unix and Linux systems, and it is also available on other platforms such as macOS and Windows. It is still widely used today and remains a popular choice for automation and command-line work.
Despite its age, Bash continues to be actively developed and improved, with new versions being released periodically.
Automation with Programming Languages
While the Bash or Bourne-again shell, is a powerful and widely used tool for automation, it has some limitations that may make it less suitable for complex types of tasks.
Consequently, as computers and software evolved, a variety of programming languages that could be used for automation were developed. C, C++, Python, Ruby, and many others were among them. These languages enabled users to automate tasks in a more powerful and flexible manner than the Unix shell including:
They provide powerful control structures such as loops and conditional statements that allow users to write more complex scripts. They also provide data types such as arrays with multiple dimensions compared to bash, lists, and dictionaries, which can be used to store and manipulate data more flexibly.
They offer a wide range of libraries and frameworks that can be used to perform a variety of tasks. These libraries and frameworks can be used to automate tasks such as web development, data analysis, and machine learning, to name just a few examples.
Let's begin with Bash and progress to Python to maximize your understanding of automation!
Get Started With Bash Scripting
You don't need to know any programming languages or have any advanced skills to get started with Bash. All you need is little knowledge of the Bash shell and some basic commands of the Linux operating system.
Working with Bash can be explained in the simple dots below:
Install Bash
Write Your Script
Execute Your Script
Yep, that's it.
Installation Process
This section will delve into the installation of bash in your operating system.
Linux-Based OS
Bash is available on most Unix and Linux systems, so if you're using one of these, you've probably already got it.
- You do not have Linux? Try 1 for free!
Open a terminal and type the following command to see if Bash is installed on your system:
bash --version
If Bash is installed, the version number should be displayed. If Bash is not already installed, you must install it before you can use it.
The process for installing Bash on a Linux system will vary depending on the distribution you are using. Here are some general instructions that should work on most Linux distributions:
1. Open a terminal and enter the following command:
sudo apt-get install bash
This command will install Bash on your system using the apt package manager.
2. If you are using a different package manager, such as yum or pacman, you can use the appropriate command to install Bash. For example, on a system using yum, you can use the following command:
sudo yum install bash
On a system using pacman, you can use the following command:
sudo pacman -S bash
3. Once the installation is complete, you can start using Bash by opening a terminal and entering Bash commands. To open a terminal, you can click on the terminal icon in the application launcher or press Ctrl+Alt+T.
Bash should now be installed on your system, and you should be able to use it to run Bash scripts and commands.
macOS
Bash is not installed by default on macOS, but it can be added using the Homebrew package manager. To use Homebrew to install Bash, first install Homebrew
Then, in a terminal, type the following command:
brew install bash
Windows-Based OS
To install Bash on Windows, you must first install the Windows Subsystem for Linux (WSL), which is a compatibility layer that allows Linux applications to run on Windows. The following are the steps for installing Bash on Windows using WSL:
1: Open the Start menu and search for "Turn Windows features on or off".
2: In the Windows Features dialog, scroll down to the "Windows Subsystem for Linux" option and select the checkbox next to it.
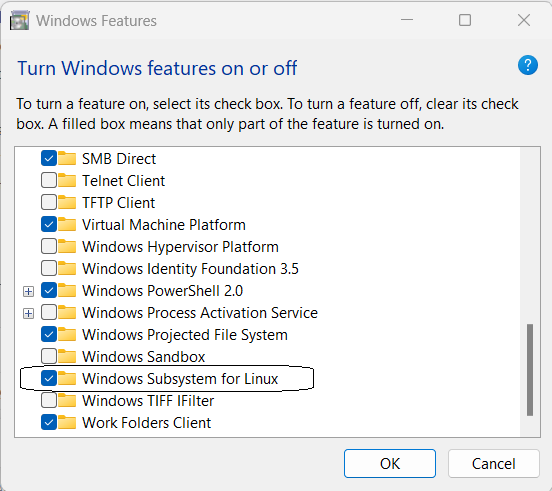
3: Click the "OK" button to enable the WSL feature.
4: Restart your computer when prompted.
5: After the restart, open the Microsoft Store and search for "Linux".
6: From the search results, select a Linux distribution, such as Ubuntu, and click the "Get" button to install it.
7: Wait for the Linux distribution to be installed. This may take a few minutes.
8: Once the installation is complete, click the "Launch" button to open the Linux terminal.
9: Follow the on-screen instructions to set up your Linux distribution and create a user account.
Writing Your First Bash Script
You can write Bash scripts, which are programs that contain a series of commands that are executed in sequence, in addition to manually entering commands in the terminal.
To create a Bash script, open a text editor and create a file with the .sh extension. Create a file called myscript.sh as an example.
You must include a shebang line at the top of the script, which tells the system which interpreter to use to execute the script. The shebang line should look something like this:
#!/usr/bin/env bash
Or
#!/usr/bin/bash
- We can use either of them to run commands in shell scripts written in the Bash shell or any other shell. When it comes to security,
#!/usr/bin/bashis recommended, while#!/usr/bin/envbash is recommended for portability.
You can enter any Bash commands after the shebang line that you want to be executed when the script is run. For instance, you could write a script that creates a directory and copies some files.
Let's do it right away! Here is the required script:
#!/usr/bin/env bash

# Create a new directory called Yaya-Life-Changing-Project
mkdir Yaya-Life-Changing-Project

# Copy files from the current directory to the new created directory above
cp * Yaya-Life-Changing-Project/

# Print a message indicating the files have been copied
echo "Files copied to Yaya-Life-Changing-Project"
This will execute the script, creating a new directory called Yaya-Life-Changing-Project in the current directory and copying all files from the current directory to the Yaya-Life-Changing-Project directory. In addition, the script will print a message indicating that the files have been copied.
To use this script, you will need to save it to a file with the .sh extension and make it executable. You can do this by entering the following commands in a terminal:
chmod +x script.sh
./script.sh
1. The first command, we just tell it, "Hey computer, change the mode of this file to executable so we can run it!"
2. Second, this is how we launch Bash scripts to start the automation!
You can modify the script to suit your needs. For instance, you can change the name of the directory or specify a different set of files to be copied. You can also add commands to the script to perform additional tasks, such as deleting files or creating new directories.
Expanding the boundaries
Based on this basis, we can use the analogy to conclude that every command we issue to the command line interface is essentially a script that performs a specific task! Amazing, the computer revolution basically.
Simplify complex use cases with this proven bash workflow!
Congratulations on completing your first steps in using Bash for automation! Installing Bash¹ and learning how to use it² is an important foundation for further exploration into the world of computers.
Are you READY for more? It is time to move forward and experiment with automation using a programming language such as the well-known Python. I'm sure you do!
Python Automation
Python is the easiest language to learn; even if you have no prior coding experience, you can learn it quickly thanks to extensive open-source tutorials and documentation. As a DevOps, you must be familiar with coding. So Python will be an excellent choice for you.
Python is a powerful programming language that places a strong emphasis on readability. It is ideal for beginners given that it is simple and intuitive, but it is also used by professionals in fields such as data science, machine learning, web development and, in our case, DevOps for automation.
Learn the basics of Python, before you can start automating tasks. This includes learning how to write and run basic Python programs, how to use variables and data types, and how to use loops and control statements.
- Nana's 5h30 Python course is your best bet. She is astoundingly good at providing the necessary building blocks in a dish for you.
Now, that you have a basic understanding of Python and are ready to move on to the automation phase, let's get started with some Python use cases.
Exploring the Role of Python in Automation
The following are some examples of Python-based automation tasks:
1- Web scraping: Python can be used to extract data from websites and save it in a usable format.
2- Automating repetitive tasks: Python's ability to execute repetitive tasks quickly and accurately makes it a good choice for automating tasks that would otherwise be time-consuming to do manually.
3- System administration: Python can be used to automate various system administration tasks, such as creating and managing user accounts, managing servers, and backing up data.
4- Testing: Python can be used to write automated tests for web applications and other software to ensure that they are working correctly.
5- Data processing: Python's powerful data manipulation libraries, such as Pandas, make it a good choice for processing and analyzing large datasets.
6- Machine learning: Python has a number of powerful libraries for machine learning, such as scikit-learn and TensorFlow, which can be used to automate tasks related to training and evaluating machine learning models.
7- Automating tasks in scientific research: Python's scientific libraries, such as NumPy and SciPy, make it a good choice for automating tasks in scientific research, such as data analysis and visualization.
Python in Automation Workflows
Python offers an efficient way to automate mundane and repetitive processes. Let's go over the basics of how to start automating tasks with this tool.
1- Install Python: The first step to using Python for automation is to install it on your computer.
2- Choose an editor: After installing Python, you will need a text editor to write your code. There are many options to choose from, such as IDLE (the built-in Python editor), PyCharm, or Visual Studio Code. Choose the one that you are most comfortable with and install it on your system.
3- Decide on a task to automate: Once you have a basic understanding of Python, you can start thinking about which tasks you want to automate. Some common tasks that can be automated with Python include data processing, web scraping, and automating repetitive tasks. Consider what tasks you do regularly that could be automated, and think about how you could use Python to accomplish them.
4- Write the code: Once you have identified a task to automate, you can start writing the code to accomplish it. Depending on the task, this may involve using Python libraries and modules such as os, subprocess, or requests. You can also use functions and classes to organize your code and make it more reusable.
5- Test and debug your code: Before you can use your code for automation, you will need to test it to make sure it is working correctly. You can use print statements and debugging tools to help identify and fix any issues.
6- Set up a schedule: Once your code is working correctly, you can set up a schedule to run it automatically. This can be done using tools like cron on Unix-like systems or the Task Scheduler on Windows. You can also use third-party tools like Zapier to automate tasks across different platforms.
Execute Automation with Python
Step 1: Install Python, Once you have downloaded the installer, run it to install Python on your system.
Step 2: Install Editor
Step 3: Open the Editor and write this Python script for automating the process of creating a new folder and saving a text file containing the current date and time:
import os
import datetime

# Get the current date and time
now = datetime.datetime.now()

# Create a new folder with the current date and time as the name
folder_name = now.strftime("%Y-%m-%d_%H-%M-%S")
os.mkdir(folder_name)

# Save a text file with the current date and time inside the new folder
file_name = "timestamp.txt"
file_path = os.path.join(folder_name, file_name)
with open(file_path, "w") as f:
    f.write(now.strftime("%Y-%m-%d %H:%M:%S"))

print("Folder and text file created successfully!")
Step 4: To execute this script, save it with a .py file extension (e.g. automation.py) and run it using the Python interpreter. For example, if you are using the command line, you can navigate to the directory where you saved the script and run the following command:
python automation.py
This will create a new folder with the current date and time as the name and save a text file with the same name inside the folder. The script can then be customized to meet your specific automation requirements by adding or modifying the code as needed.
That's all there is to Python, right? Yes! Great work
You can now try more complex scenarios with Python like:
Install the cloud packages with which you want to interact and perform cloud automation.
Create Scheduled Tasks and handle Errors
Monitor Applications
To Wrap Things Up
We began by stating the progression of computing from the simplicity of the shell to the enhanced capabilities of bash, and finally to the versatility and power of Python, and we did write our Bash and Python scripts and executed them to do the required automation!
Both Bash and Python are powerful tools for automation, and the best choice will depend on the specific needs of your task. Bash is a good choice for simple tasks that can be performed using the built-in commands and utilities, while Python is a better choice for more complex tasks that require a full-featured programming language.
Automation is a key aspect of DevOps that helps optimize various processes in the software development lifecycle. Adopt DevOps!
Foundation to more
You've now established a solid foundation in automation, there's plenty of room for you to advance your knowledge and delve deeper into other technologies.
Consider checking one of these resources to learn more and broaden your Automation Skills:
Start Automation with Powershell.
Automate the provisioning of your infrastructure with Terraform, AWS CloudFormation if you are using AWS infra, or ARM if you are using Azure.
Automate the configuration management of your infrastructure with Ansible, Chef & Puppet