Cleaning up your Microsoft Azure Account
What should your first priority be in reclaiming your account fresh again?

Engineer, Builder, Trainer.
Introduction
Maintaining a clean and organized Microsoft Azure environment is essential for any business. Not only does it ensure that the cloud-based platform runs smoothly, but it also helps to protect your data from unauthorized access or malicious attacks. In this essay, I will discuss three key steps to effectively cleaning up your Microsoft Azure environment.
Taken steps
From my experience, the first step in cleaning up an Azure environment is ensuring that all resources are properly configured and managed correctly. This includes setting appropriate security policies on all accounts, as well as configuring proper resource groups for each application or service you have running in the cloud platform. Additionally, regularly performing maintenance tasks such as patching systems can help keep everything running optimally and reduce potential risks of attack or exploitation by cyber criminals looking for vulnerabilities in outdated software versions.
The second step involves monitoring usage of resources within the system so you can identify areas where more efficient use could be made of them - such as shutting down unused services which are still consuming valuable compute power unnecessarily – thus reducing costs associated with those services being left idle when not needed.. It’s also important to monitor trends over time; if there’s suddenly a sudden spike in usage then this may indicate something untoward going on which needs further investigation immediately before any damage can be done due to malicious activity taking place without detection until too late!
Finally , keeping track of changes made within the system should be an ongoing process throughout its lifetime. Keeping track allows administrators quickly assess what has changed recently , allowing them address issues swiftly instead having wait while they figure out what was changed last week! This ensures cost savings by avoiding unnecessary downtime caused by misconfigurations resulting unexpected errors occurring during operation.
Operations
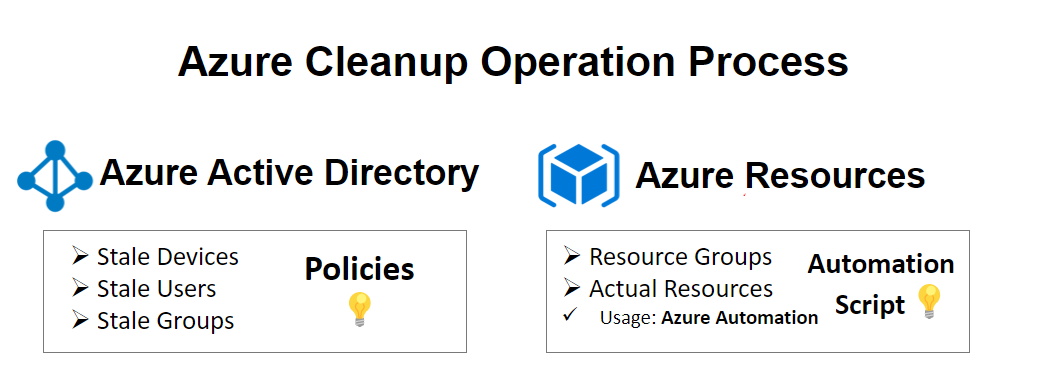
This article describes how to clean AAD devices, user, groups, and Azure resources in an automated manner.
Hint: It will be easier to find related resources if you inspect within the resource groups.
Azure Active Directory Cleanup
Understand Stale devices, It is one that has been registered with Azure AD but has not been used to access any cloud apps for an extended period. Prerequisites: The user must fit one of the responsibilities listed below to begin the cleaning procedure
Global Administrator
Cloud Device Administrator
Intune Service Administrator
Hmm, what is Microsoft Intune
Policy
To effectively remove obsolete equipment from your environment, you should implement a related policy. You can use policy to ensure that your account for all factors related to obsolete technology.
1: Device Menu Blade
Within the Azure portal, you will see a list of devices that are enrolled. Simply click and enter your login information. Following the title hyperlink.
Usage the timestamp parameter, which is a string of characters or encoded data that indicates the time and date of an event. Within the powershell it's also refered to: ApproximateLastLogonTimestamp.
Get devices to CSV
Get-AzureADDevice -All:$true | select-object -Property AccountEnabled, DeviceId, DeviceOSType, DeviceOSVersion, DisplayName, DeviceTrustType, ApproximateLastLogonTimestamp | export-csv devicelist-summary.csv -NoTypeInformation
Disable Devices
$dt = (Get-Date).AddDays(-90) $Devices = Get-AzureADDevice -All:$true | Where {$_.ApproximateLastLogonTimeStamp -le $dt} foreach ($Device in $Devices) {Set-AzureADDevice -ObjectId $Device.ObjectId -AccountEnabled $false}
Delete Devices
$dt = (Get-Date).AddDays(-120) $Devices = Get-AzureADDevice -All:$true | Where {($_.ApproximateLastLogonTimeStamp -le $dt) -and ($_.AccountEnabled -eq $false)} foreach ($Device in $Devices) { Remove-AzureADDevice -ObjectId $Device.ObjectId}
2: PowerShell Commands
The following PowerShell commands as administrator can be used to clean up azure ad devices.
Connect-MsolService : connect to the Azure AD tenant.
Get-MsolDevice: Get the list of devices
Get-MsolDevice -all: get all the device details without any filter.
Get-MsolDevice -all | select-object -Property Enabled, DeviceId, DisplayName, DeviceTrustType, ApproximateLastLogonTimestamp | export-csv C:\devicelist- summary.csv: stale devices to excel
Disable-MsolDevice: Disable Stale devices
Remove-MsolDevice: delete stale devices
Azure Resources Cleanup
In the case of unused resources, we can delete them automatically with a powershell script. You must use the ExpiresOn tag on the resources and then specify a date that is earlier than today.
Script
$connectionName = "AzureRunAsConnection"
try
{
    # Get the connection "AzureRunAsConnection "
    $servicePrincipalConnection=Get-AutomationConnection -Name $connectionName

    Connect-AzAccount `
        -ServicePrincipal `
        -Tenant $servicePrincipalConnection.TenantId `
        -ApplicationId $servicePrincipalConnection.ApplicationId `
        -CertificateThumbprint $servicePrincipalConnection.CertificateThumbprint
}
catch {
    if (!$servicePrincipalConnection)
    {
        $ErrorMessage = "Connection $connectionName not found."
        throw $ErrorMessage
    } else{
        Write-Error -Message $_.Exception
        throw $_.Exception
    }
}

$expResources= Search-AzGraph -Query 'where todatetime(tags.expireOn) < now() | project id'

foreach ($r in $expResources) {
    Remove-AzResource -ResourceId $r.id -Force -WhatIf
}

$rgs = Get-AzResourceGroup;

foreach($resourceGroup in $rgs){
    $name=  $resourceGroup.ResourceGroupName;
    $count = (Get-AzResource | Where-Object{ $_.ResourceGroupName -match $name }).Count;
    if($count -eq 0){
        Remove-AzResourceGroup -Name $name -Force -WhatIf
    }
}
Implementation of the Script
1- Import Modules
Create an Azure Automation within the portal
Give it a name, RG, Service principal default
Once created, Modules within the left tab
Browser Galery
Import az.accounts
Import az.resourceGraph
Import az.resources
2- Create Runbooks
Give it name
Powershell Type
Paste the script and click save
Publish so we can use it
3- Launch the Automation
Create a schedule,
Specify name & start date.
Run the runbook to test if it worked.
Check for insights
Another great way to get started before cleaning is to expand this workbook in Sentinel. This will provide you with a good foundation before you proceed with anything else.
Final Thoughts
As I did, you may encounter an account that has been in sleep mode for a while. So having a clearer vision of what to consider is a good first step. By following this article carefully , your business using Microsoft Azures will be able to maintain the environments efficiently with minimal disruption operations due to unplanned outages!